Tim commented on my recent blog post about my automated plant watering system and asked if I could go into some more detail about the steps I went though to set up the software side of the project. The project used cube and cubism to make live charts of my chilli plant’s moisture levels available over the Internet. In this post I will go though a step-by-step guide explaining how I set up the software that powered these charts. I’ve tried to write the article for readers with no previous experience of server administration or software development, but I have thrown it together faily quickly, so if anything below is unclear, then do post a comment below and I will try to fix it.
Launching an Amazon EC2 Server
To make the project available over the Internet, I used Amazon EC2 to provision a server which is free for one year. The first step is to register at Amazon AWS and log into the AWS Management Console and click the ‘EC2’ button:

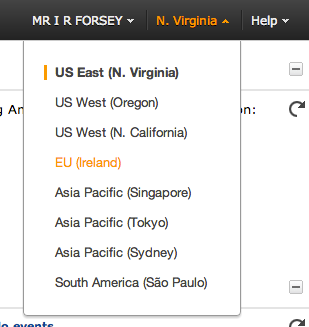
Now, select from the drop down menu next to your name (top right corner), the region where you would like your server to live. I’m based in the England, so I will be using the EU (Ireland) region as it is closest to me and therefore will likely give me the best network performance.
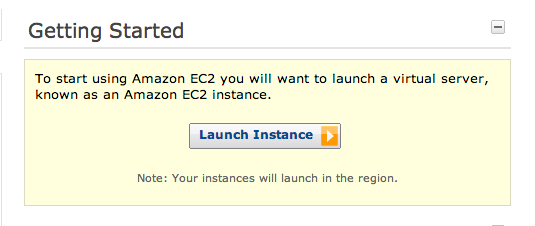
On the homepage of the AWS Management Console, you should see a ‘Getting Started’ section with a ‘Launch Instance’ button. Click this to start a wizard that will walk us through creating our server. Alternatively you can start this wizard by clicking the ‘Instances’ button on the left hand menu and then clicking the ‘Launch Instance’ button.
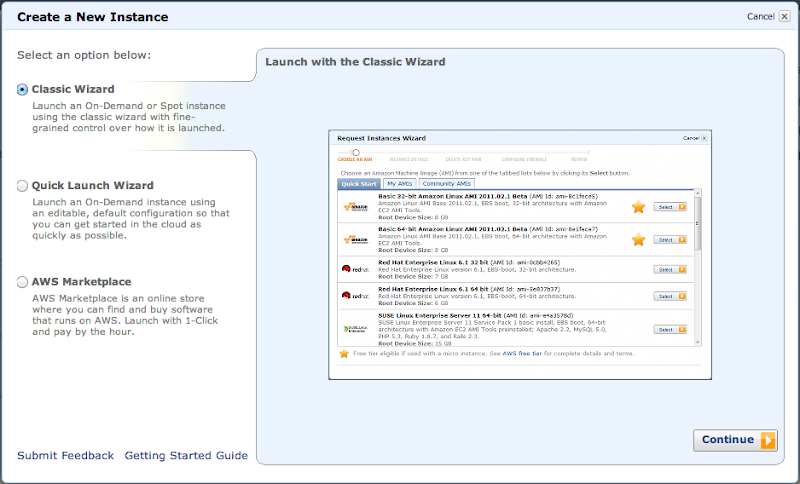
Select the ‘Classic Wizard’ option and click the ‘Continue’ button.
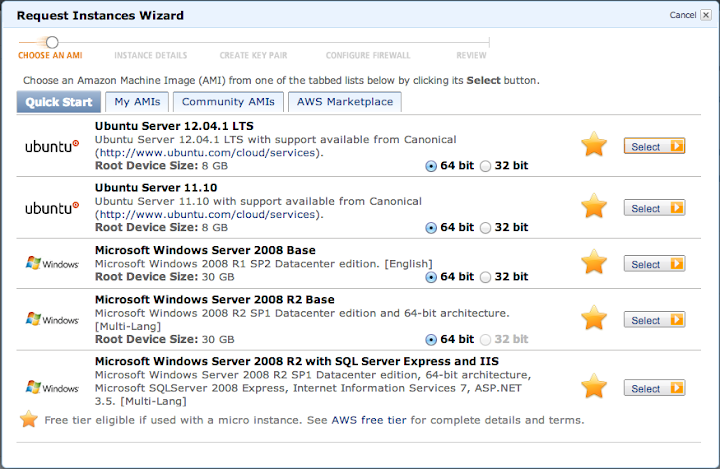
The next screen shows you the AMIs available for you to. AMIs are the starting blueprints for our server. They contain the operating system (and sometimes other software) that your server will be using. The options with the star symbol are those that qualify for the one year free tier. We will be using the Ubuntu Server 64 bit AMI which does qualify for the free tier. I’ll be using version 12.04.1 LTS, but other versions should also be fine for this tutorial.
On the next screen, the defaults should be fine:
* Number of Instances set to ‘1’ * Instance Type set to ‘T1 Micro’. T1 Micro instances are the only size available under the Amazon free tier * Launch Info set to the EC2 tab with an Availability Zone of ‘No Preference’
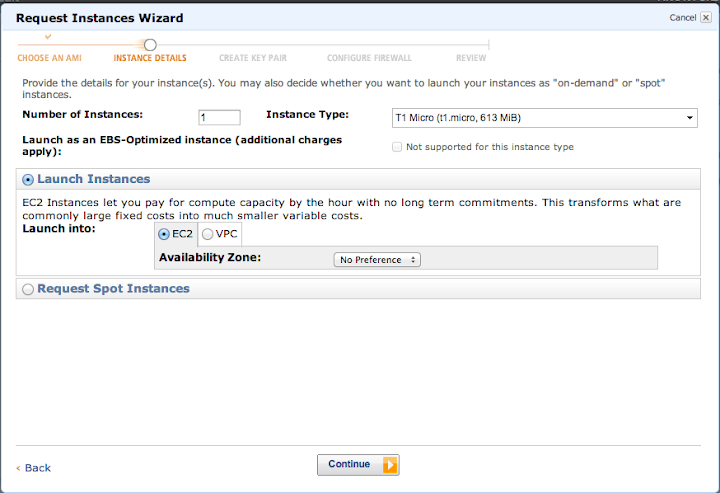
Click ‘Continue’.
On the next screen most of defaults should be fine, the only thing I change is that I turn on ‘Termination Protection’. This prevents you accidentally Terminating your server. For more details about this, see my blog post over at the Net-a-Porter Tech Blog. Once you have checked the ‘Termination Protection’ checkbox, click ‘Continue’.

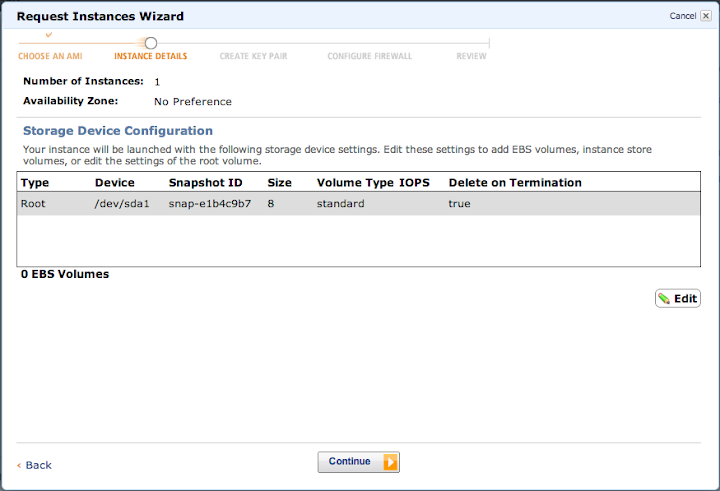
The next screen lists the EBS volume we will be using. This EBS volume will act as the Hard Disk for your server and the defaults are fine. Click ‘Continue’.
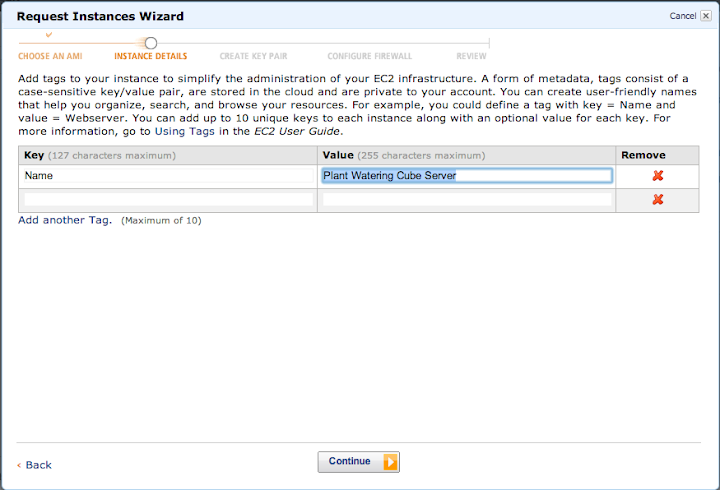
On the next screen, give your server a meaningful name. I’m calling mine ‘Plant Watering Cube Server’. Then click ‘Continue’.
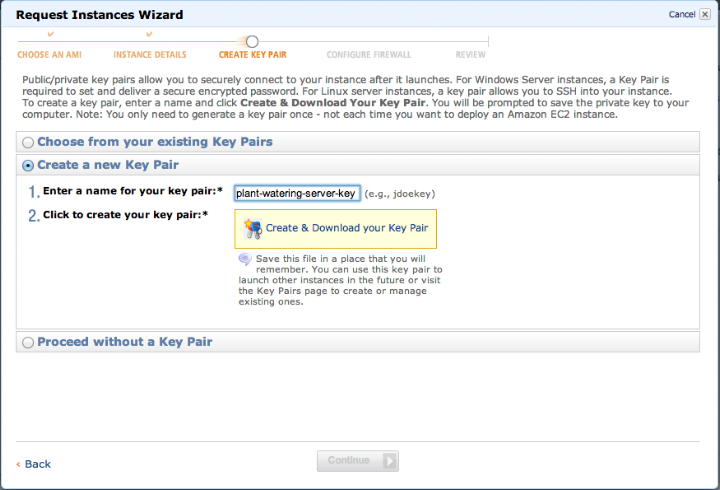
On the next screen you will create a key pair for your server. Enter a name (I’m using ‘plant-watering-server-key’) and click the ‘Create & Download your Key Pair’ link to download your key file. Keep this file secret, keep it safe, as it acts like a password and allows only you to log in and administrate your server.
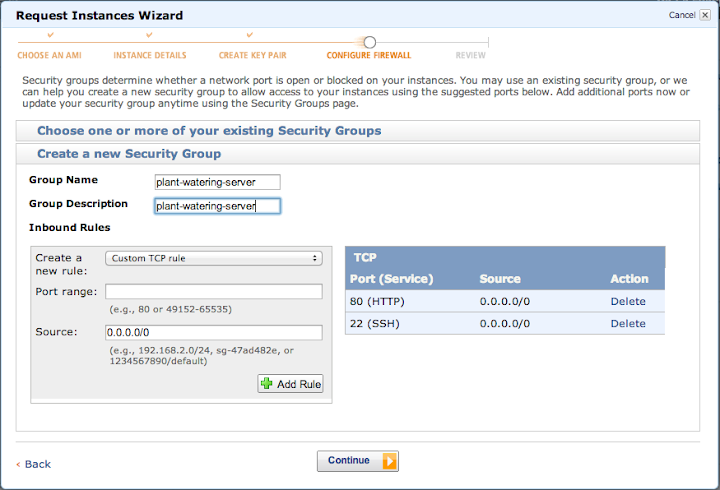
On the next screen we will configure the firewall. Click the ‘Create New Security Group’ tab and enter the group name and description as ‘plant-watering-server’. We are going to add two rules to the filewall:
* Custom TCP Rule, Port Range: 80, Source 0.0.0.0/0. This rule will allow anyone to read data from our Cube Server. Later we will add some security measures to ensure only our Arduino can write data into the cube server. * Custom TCP Rule, Port Range: 22, Source 0.0.0.0/0. This will allow us to log in (via SSH) and administrate our server.
Once you have the two rules added, the screen should look like this:
Click ‘Continue’ to bring up the review page and then click ‘Launch’ to start your server!
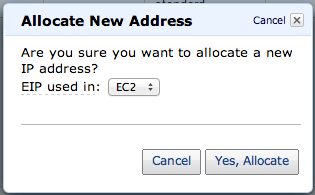
We will want to reserve a static IP address for our server, so its IP address doesn’t change every time we restart it. To do this click the ‘Elastic IPs’ item on the left hand menu and click the ‘Allocate New Address’ button. A confirmation dialog pops up; click the ‘Yes, Allocate’ button.
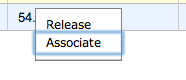
A new IP address should appear on your Elastic IPs page. Right click it and select associate.
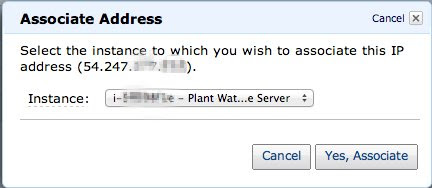
On the dialog that appears, select your server from the drop down menu and click the ‘Yes, Associate’ button.
Before we leave this page, take a note of the IP address (four numbers seperated by dots) as we will need it later to log in and administrate our server.
If you now click the ‘Instances’ button of the left hand menu, you should see your instance with a state of ‘running’ and a green light icon. On the bottom pane, if you scroll down to Elastic IP, you should see the IP address you noted down earlier. Now that the server is running, we can log in and install the software we need.
SSHing into the server
We are going to SSH into our server to install cube. The way to achieve this will depend on your operating system of your computer.
Mac OSX and Linux
For Mac OSX or Linux, start up a terminal. For Mac OSX, do this by typing ‘terminal’ into spotlight and hitting enter. In the terminal type ssh -i /home/ian/Downloads/plant-watering-server-key.pem ubuntu@54.247.0.0. Replace /home/ian/Downloads/plant-watering-server-key.pem with the path to the key file you downloaded earlier and replace 54.247.0.0 with the Elastic IP you noted down.
You may get asked if you would like to continue because the authenticity of your server cannot be established. Type yes and hit enter.
You may also get the following error:
@@@@@@@@@@@@@@@@@@@@@@@@@@@@@@@@@@@@@@@@@@@@@@@@@@@@@@@@@@@
@         WARNING: UNPROTECTED PRIVATE KEY FILE!          @
@@@@@@@@@@@@@@@@@@@@@@@@@@@@@@@@@@@@@@@@@@@@@@@@@@@@@@@@@@@
Permissions 0644 for '/home/ian/Downloads/plant-watering-server-key.pem' are too open.
It is recommended that your private key files are NOT accessible by others.
This private key will be ignored.
bad permissions: ignore key: /home/ian/Downloads/plant-watering-server-key.pem
Permission denied (publickey).
To solve this run the command chmod 600 /home/ian/Downloads/plant-watering-server-key.pem again replacing /home/ian/Downloads/plant-watering-server-key.pem with the path to your key file. Once you have run this command, try the ssh command above again (tip: press the up arrow a couple of times to get back to this ssh command and hit enter).
You should successfully log in and recieve terminal output as follows:
Welcome to Ubuntu 12.04.1 LTS (GNU/Linux 3.2.0-31-virtual x86_64)

** snip lots of lines **

ubuntu@ip-10-48-0-0:~$
Windows
SSHing into your server from a windows computer involves a little more work. Follow this tutorial. Once you have successfully logged in, you should have a putty terminal window with the following output:
Welcome to Ubuntu 12.04.1 LTS (GNU/Linux 3.2.0-31-virtual x86_64)

** snip lots of lines **

ubuntu@ip-10-48-0-0:~$
Installing the software we need
Cube requires a couple pieces of software in order to function. We are going to install this software via a package manager called aptitude. First ensure that aptitude’s list of repositories is up to date by running this command
sudo apt-get updateOnce this command has finished running, we can start installing software.
MongoDB
Cube uses a piece of software called MongoDB to build it’s database. In our case this database will store all the moisture records from our plant. To install MongoDB, run this command. When asked if you wish to continue type ‘y’ and hit return.
sudo apt-get install mongodb mongodb-serverTo check MongoDB has been installed run the command:
mongo --versionAnd you should see output similar to:
MongoDB shell version: 2.0.4node.js
Cube is written in a programming language called JavaScript and node.js is a piece of software that can run JavaScript programs. To install it run the following command, hitting enter and typing ‘y’ when prompted to.
sudo apt-get install python-software-properties
sudo add-apt-repository ppa:chris-lea/node.js
sudo apt-get update
sudo apt-get install nodejs npm
Once all the commands have run, type the following to verify node.js has installed:
node -vYou should see output similar to:
v0.8.17Cube
Now to actually install our cube server. Run these commands:
mkdir ~/cube
cd ~/cube
npm install cube
To start our cube server, run these commands:
node ~/cube/node_modules/cube/bin/collector.js 2>&1 >> ~/cube/collector.log &
node ~/cube/node_modules/cube/bin/evaluator.js 2>&1 >> ~/cube/evaluator.log &
To check the cube server is running, you can read the logs by running this command
cat ~/cube/collector.log You should see output similar to:
13 Jan 17:37:45 - starting mongodb client
13 Jan 17:37:45 - starting http server on port 1080
13 Jan 17:37:45 - starting udp server on port 118
If you ever need to stop the cube server, you can run this command.
pkill -9 nodeTest out the pkill command now and then re-run the two commands to start the cube server. Run the cat command to view the logs again and you should now see the cube server has started up again. In this instance, I first started the cube server at 17:37, then stopped it and started it again at 17:43.
13 Jan 17:37:45 - starting mongodb client
13 Jan 17:37:45 - starting http server on port 1080
13 Jan 17:37:45 - starting udp server on port 1180
13 Jan 17:43:49 - starting mongodb client
13 Jan 17:43:49 - starting http server on port 1080
13 Jan 17:43:49 - starting udp server on port 1180
Node Proxy
Cube servers aren’t designed to be made public facing (see the For Internal Use Only section on this page) and out of the box it would allow anyone on the Internet to add moisture readings into the cube server. Because we only want our plant to write moisture readings, we will use a piece of software called node http-proxy and a little script I wrote to add some basic password protection.
Important - This security is primitive, but will suffice for a hobby project as it will stop most attackers writing crap into your database. Despite this, be aware that without SSL running, your cube server is still prone to network sniffing attacks and therefore DO NOT use a password you use for other websites in the steps below.
mkdir -p ~/cube-proxy
cd ~/cube-proxy
wget https://gist.github.com/raw/4525329/cube-proxy.js
npm install http-proxy
Now to set your password run this command, but change elephants to your password:
sed -i 's/change_this_password/elephants/g' ~/cube-proxy/cube-proxy.jsIf you ever need to change your password, run the following, again replacing elephants with your password:
cd ~/cube-proxy
rm cube-proxy.js
wget https://gist.github.com/raw/4525329/cube-proxy.js
sed -i 's/change_this_password/elephants/g' ~/cube-proxy/cube-proxy.js
To run this node proxy, run the following command:
sudo node ~/cube-proxy/cube-proxy.js &Testing the cube server
So now our cube server is up and running, we can give it a test run.
On your computer, install Chrome and the postman chrome extension. To pull some data out of the cube server, load up postman, and in the textbox that says ‘Enter Request URL here’, enter the following URL, but replacing 54.247.0.0 with your Elastic IP Address that you noted down earlier.
http://54.247.0.0/1.0/metric/get?expression=sum(moisture(moisture))&step=3e5&limit=3You should see a response come back similar to this:
[
    {
        "time": "2013-01-13T18:20:00.000Z",
        "value": 0
    },
    {
        "time": "2013-01-13T18:25:00.000Z",
        "value": 0
    },
    {
        "time": "2013-01-13T18:30:00.000Z",
        "value": 0
    }
]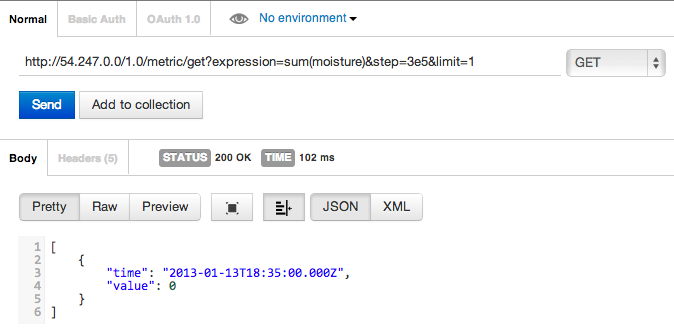
As you can see the moisture returned is 0, because we haven’t written any readings into the database yet. Let’s try writing some test readings.
Change the URL to http://54.247.0.0/1.0/event/put, change the HTTP method to POST. Click the headers button and add a Header ‘cube-password’ with a value of the password you set earlier in this tutorial. For the request body, click the ‘raw’ button and paste in the following data. This will write a moisture figure of 123:
[
  {
    "type": "moisture",
    "data": {
      "moisture": "123",
      "watered": "0"
    }
  }
]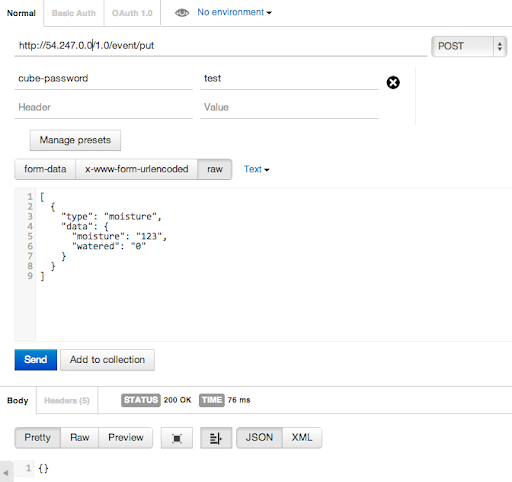
After clicking ‘send’, you should see a status of ‘200 OK’ indicating that our data has been written successfully by the cube server. Let’s see if we can read it back out. On the left hand menu, you should see the GET request we send earlier to read the data from the cube server. Click it and click the send button. This time you should see the ‘123’ moisture figure we wrote:
[
    {
        "time": "2013-01-13T18:45:00.000Z",
        "value": 0
    },
    {
        "time": "2013-01-13T18:50:00.000Z",
        "value": 0
    },
    {
        "time": "2013-01-13T18:55:00.000Z",
        "value": 123
    }
]
So now we know we can read/write from/to the cube server, so let’s use cubism to hook a chart to our cube server.
Cubism
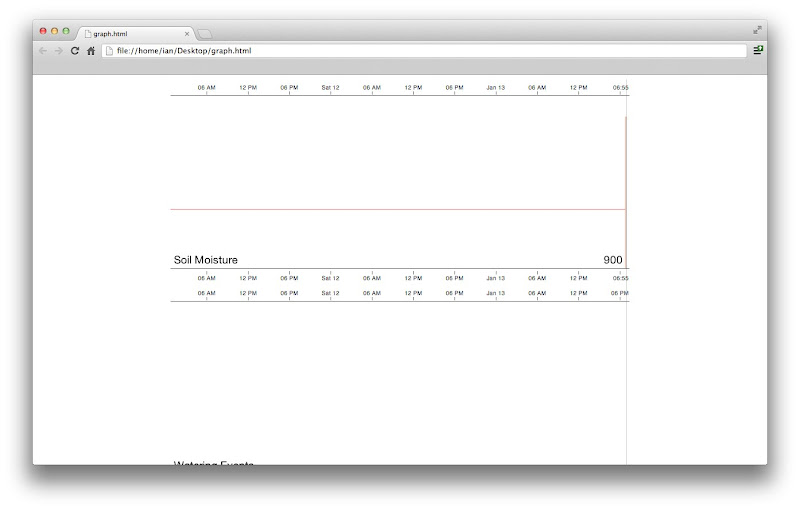
Paste the HTML in this gist into a text editor (such as notepad) and change IP Address at line 128 from 54.247.0.0 to your cube server’s IP Address. Save the file with the filename graph.html and open it up in a web browser such as Chrome. You should see something along the lines of this:
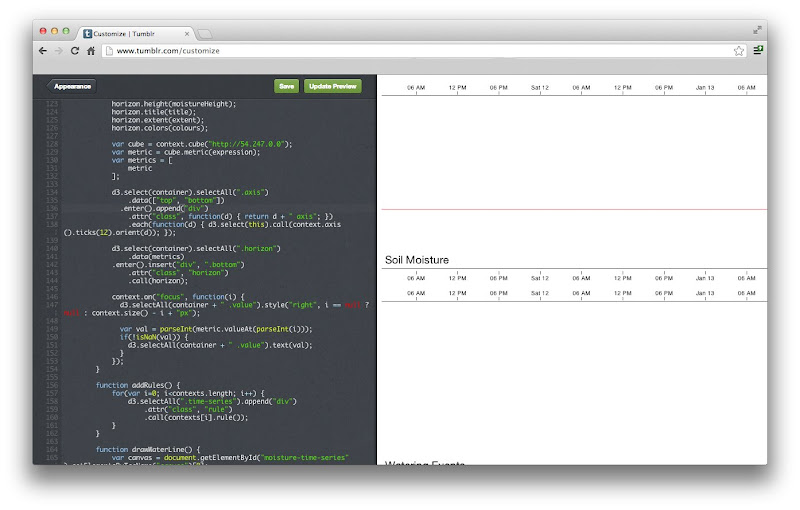
This HTML can be hosted on the Internet. One of the easiest ways to get it hosted with a friendly URL is to put it on a tumblr blog. To do this:
- Register a blog at http://www.tumblr.com and pick a tumblr URL.
- Go to the settings page by clicking the cog icon

- Click the name of you blog at the bottom of the menu on the left hand side
- Click the ‘Customize’ button under the ‘Theme’ section
- Click the ‘Edit HTML’ button
- Replace the all the existing HTML with the HTML in your graph.html file
- Click ‘Update Preview’. You should see you charts in the right hand pane
- Click the ‘Apperance’ button and click the ‘Save’ button
- Your chart should now be available at your tumblr URL
Arduino
We now have the chart hosted at tumblr.com, however our Arduino is not writing data to it. To do this we will need to add some code to our Aduino program.
The Arduino code I used is available here. There are two important things to change in the file:
- Change the cube server IP on line
38to your cube servers Elastic IP. - Change the password on line
172to your cube password you setup earlier in this tutorial.
You may also need to change the Local IP settings at the top of the file to match the settings for your router. On your computer run ifconfig (in a terminal on OSX/Linux) or ipconfig (in Start > Run > cmd for Windows) to get an idea of what these settings should be.
The code relies on two Arduino libraries:
Both of the above pages have descriptions detailing how to install the libraries. Once installed, you should be able to compile the Arduino code onto your Arduino and start seeing it posting moisture readings to your chart!
Comments !